Managing Users in QuickBooks Online
A multi-user accounting application needs good tools for assigning access permissions. QuickBooks Online has it covered.
You trust your employees, or you wouldn’t have hired them. But you also have a grave responsibility to your customers and vendors: to keep their data safe, and to ensure that records and transactions remain accurate and unchanged throughout their lives.
For that reason, QuickBooks Online offers you the option of restricting users to specific areas of the site and to individual activities. Each time you invite a new user to work on your accounting information, you should go through the process of assigning these rights.
To get started, click on your company name in the upper right of the screen, and then click on Manage Users. Click New to open the mini-interview.
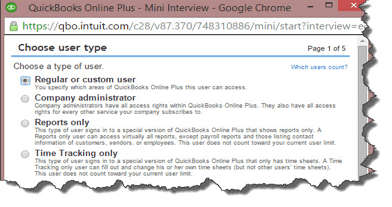
The first screen of the mini-interview explains the four user types available. They are:
Regular or custom user. You’d assign this to staff who will be working with accounts receivable and/or payable but don’t need access to anything else.
Company administrator. This will be you or a trusted employee. The individual with this role has access to the entire site and all actions.
Reports only. Just like the name says, users at this level can only view reports. They cannot, however, see payroll reports or any that contain contact information for customers, vendors, or employees.
Time Tracking only. You can give employees and vendors access to timesheets only, so that they can complete and edit their own.
Note: The latter two designations do not count toward the user limit you chose when you signed up for QuickBooks Online. In addition, you can invite up to two accounting or bookkeeping firms.
Select Regular or custom user, then Next. This is the only access level that allows you to set limits. Other levels are already established.

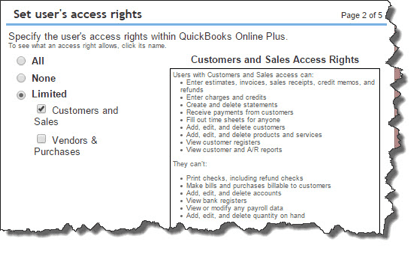
Figure 2: If you’ve selected Regular or custom user for an employee, you have some control over the areas he or she can access.
- If you click the button in front of Limited, then put a check mark in front of Customers and Sales, the employee will be able to access all add, edit, and delete QuickBooks Online records. In addition, he or she can work with some transactions and forms, as well as view reports and registers. There are many restricted areas and functions at this level, including check-printing, inventory adjustments, and payroll data access.
- Employees who will be working with Vendors & Purchases have a similar role on the vendor side.
- If you want an employee or vendor to be able to access his or her own timesheet but no other areas of QuickBooks Online, you would choose None.
- The All designation is reserved for users who have all of the access rights described above. They can also, for example, do some payroll tasks, make deposits and transfer funds, and work with budgets.
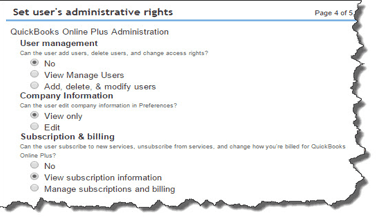
Click Next after you’ve selected an access level. The next window will display the user’s administrative rights, unless he or she is an employee or vendor who will only have access to timesheets. In those cases, there will be an additional window first that contains a drop-down list consisting of employee and vendor names.
Once you’ve assigned administrative rights, click Next to “invite” the individual to QuickBooks Online in the specified role. Enter the name and email, then click Next. The user will receive an email containing a link to a page where he or she can select a user ID (or enter an existing Intuit Business Services ID).
When your users have accepted the invitation and logged in, their status on your Manage Users page will change from Invited to Active.
You may want to discuss with us your assignment of access levels. It’s one thing to see a list of permissions, but it’s quite another to determine whether a specific role can put you at risk for critical errors – or worse.


