QuickBooks Online’s Sales Tax Tools: The Basics
Are you paying the correct amount of sales tax to the proper agencies? QuickBooks Online can help.
It’s hard to imagine that small businesses used to have to manage sales tax manually. It was quite a time-intensive process, and it was so easy to make mistakes.
QuickBooks Online can handle the mechanics for you. Its sales tax tools are quite simple; they help set up both single and combined (up to five) rates. Then when you create invoices and other sales forms, you can select the appropriate rate(s). The site does the necessary calculations and includes sales tax in the totals. It also keeps a running tally of how much you owe to taxing agencies.
Bear in mind, though, that absolute accuracy is required for this often-confusing process. States have their own individual requirements, and in some geographical areas, you’ll have to charge county and/or municipal sales tax. So before you start entering rates and charging customers, we should sit down and go over issues like:
- Whether you need a sales tax permit,
- How to handle sales in other states,
- What transactions are exempt from sales tax, and
- How often – and to whom – you submit the money you’ve collected from customers.

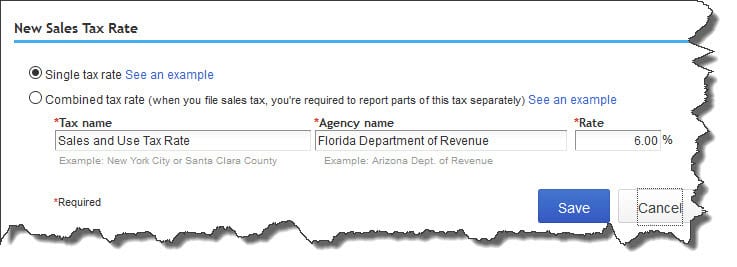
Figure 1: QuickBooks Online simplifies the mechanics of charging sales tax. But let us work with you before you start using them.
This element of accounting is so critical that QuickBooks Online includes a special section devoted to it. To get to the Sales Tax Center, you’d click on Sales Tax in the site’s toolbar. The page that opens will eventually display information about the sales tax you owe for a specific period and recent payments you’ve made.
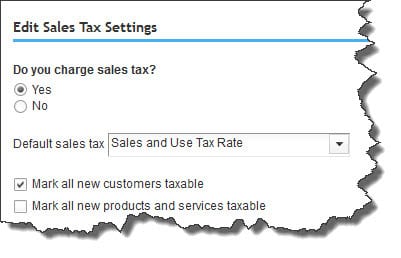
It’s the Related Tasks over to the right that we’ll address first. The Edit sales tax settings link opens a small window that asks whether you charge sales tax. It also wants to know whether you want to specify one rate as your default – the rate that fills in automatically when you enter a taxable item on a sales form – and whether all customers, products, and services should be considered taxable.
Note: Even if you choose a default tax rate, you’ll be able to change it on individual forms as needed.

Figure 2: One of the things we’ll do as we help you get started with sales taxes is to make sure that your site settings are correct.
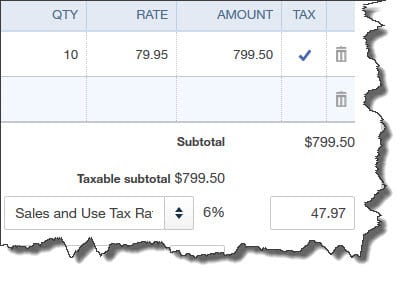
QuickBooks Online will now include a Tax column on sales forms like invoices. After you’ve entered all of your taxable items, you’d look below the line over to the right that says Taxable subtotal. Directly below that is a field where the sales tax rate should appear.
If you’ve created rates and they aren’t showing, you’d click the up-and-down arrow to display the list. Either select the appropriate one or click +Add new. QuickBooks Online would then multiply the taxable subtotal by your tax percentage and enter the result in the box to the right.

Figure 3: Once you’ve entered all of your items and/or services and you have a taxable subtotal, QuickBooks Online will calculate the sales tax payable based on the rate selected.
When you want to see where you stand with your sales tax obligation to date, you can run three reports designed to display this information:
- Taxable Sales Summary shows a summary of all of the sales to which you’ve assigned a tax rate in your sales forms.
- Sales Tax Liability Report tells you what you’ve collected in sales tax, as well as what you owe to taxing agencies.
- Taxable Sales Detail is a more comprehensive version of the Taxable Sales Summary report. Its columns include Date, Transaction Type, Customer, Quantity, Rate, Amount, and Balance.
When sales taxes are due, you will pay them directly from the Sales Tax Center. Its Sales Tax Owed table will display the amounts you owe and to whom. If they’re recorded as a paid bill or a check, they won’t appear in the Recent Sales Tax Payments table.
We can’t emphasize strongly enough the importance of correctly setting up your sales taxes from the start or of meeting the deadlines that your local taxing agencies enforce. Let us know when you want to start implementing this element of QuickBooks Online.


